
Cookie Decorating: The Ultimate Guide for Beginners and Pros
Cookie Decorating: The Ultimate Guide for Beginners and Pros
Why decorating cookies is an art
Cookie decorating is more than just a hobby. It's an art form that requires precision, creativity, and an eye for detail. In this comprehensive guide, we'll show you how to turn your cookies into masterpieces that not only taste great, but look stunning too.
We'll start with the basics and work our way up to decorating cookies! If you're already a baking pro, just skip to step 4 to learn all about decorating cookies.
Step 1: Choosing the right ingredients
- The recipe:
- 250 g flour
- 1 packet of baking powder
- 60 g sugar
- 1 pinch of salt
- 1 egg
- 125g butter
- Flour: The foundation
Choosing the right flour is crucial for the texture of your cookies. We recommend wheat flour type 405 for a classic result. - Sugar: Sweet perfection
Granulated sugar or powdered sugar? For a finer finish, we recommend powdered sugar . - Fats: Butter vs. Margarine
Butter provides a rich flavor, while margarine offers a lighter texture. Our choice? Unsalted butter for maximum flavor intensity. - Miracle powder
Baking powder is the little miracle powder that turns even the saddest dough into an inflated superstar. - Eggs: We need eggs, right?
At least one egg should be included in the basic recipe so that the dough binds well and has a great consistency. But it can also be vegan, give it a try. Half a banana is one egg, up to four eggs can be substituted.
Mix all the ingredients together and knead as much as you can. Then roll out the dough with a rolling pin.
Step 2: The art of rolling out and cutting out
- The right thickness
A thickness of 4-6 mm is ideal for most cookies. Too thin and they will be too crispy, too thick and they will not be baked properly. Especially if you are using our cookie cutters, we recommend at least 5 mm thickness so that you can easily emboss the details into the cookie.
- Cookie cutters and sizes
From classic circles to complex shapes, the possibilities are endless. We recommend our sustainable cookie cutters made from biodegradable plastic for unusual designs and beautiful results.

Cut out cat cookies made with individual cookie cutters from Biocraftlab.
After you have shaped your cookies with the cookie cutters, it's time to put them in the oven. Place the cookies in the oven at 180 °C for around 10 to 12 minutes.
Step 3: Baking time and temperature: precision is key
- Preheating is mandatory
A well preheated oven is crucial. We recommend a temperature of 180°C . - baking time
Baking time varies depending on thickness and size. On average, cookies should bake for 10-12 minutes .
As soon as the cookies are golden brown and the kitchen smells of Christmas, you can take them out of the oven. Let the cookies cool for a few minutes before decorating.
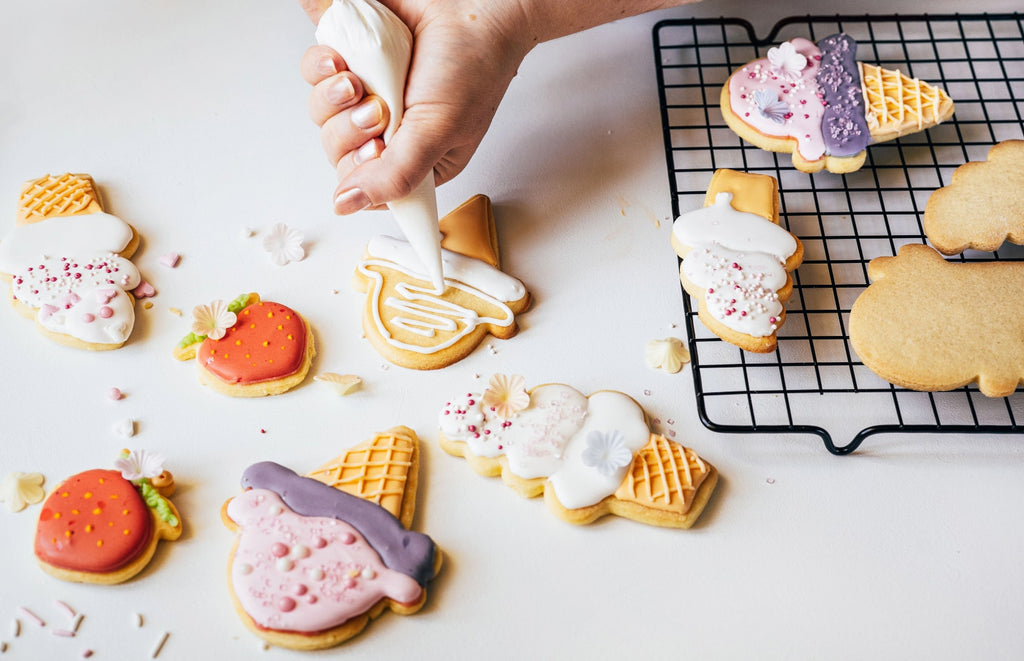
Step 4: Glaze and decoration: the finishing touches
Now the real magic begins, the transformation of the boring butter biscuit into a beautiful cookie masterpiece! There are various options available to you, which can also be combined very well with one another.
Icing icing for professionals
For a smooth surface, icing made from water and powdered sugar is unbeatable. With the addition of food coloring, you can create unusual, colorful cookies.
- Ingredients :
- 120 g icing sugar
- 1 tbsp lemon juice
- 5-10 ml water
- 1-5 drops of food coloring
- Preparation: Mix all ingredients together and stir well. Now apply the icing to the cookies using a brush or piping bag. It is best to use the embossed elements of the cookie cutters to highlight the contours of the cookie in different colors.
- DIY option : Put regular table sugar into a high-performance blender and pulverize.
- Low carb frosting: Erythritol as an alternative requires a little more liquid.
- Preparation tips: Too much liquid can ruin the texture. Less liquid can help create a 3D structure to make certain areas of the cookie stand out more.

Glazed cookies made with the Anatomy , Biology and Medicine cookie cutter set from Biocraftlab.
Fondant for beginners
For more complex designs, we recommend rolled fondant . It is flexible and offers a range of color options.
- Ingredients :
- 200 g rolled fondant
- Preparation: Fondant is easy to knead and easy to roll out. Knead the fondant well before use and then roll it out to a thickness of approx. 2 mm. The best way to cut the fondant into a suitable shape is with a knife or cookie cutters. Fondant is particularly suitable for large areas of the cookie or raised areas such as eyes. It gives your cookies a 3D dimension.
- DIY option : Using white marshmallows, you can easily make white fondant at home.
- Variety of colors: Fondant is now available in almost all colors.
- Preparation tips: Make sure to roll out the fondant really thinly so as not to overload the cookies.

Colorful fondant makes it easy to make detailed cookies. Different layers can also be used to create 3D patterns and levels.
Sprinkles, pearls and co: Everything for that certain extra
Use edible pearls and sprinkles for added texture and color.
- Ingredients :
- Colorful sugar sprinkles
- Chocolate pearls
- Sugar Eyes
- Coconut flakes
- Lemon or orange peel
- Herbs
- etc.
- Preparation: There are no limits here. Use sugar sprinkles to add colorful accents. Use coconut flakes to add texture to white elements. Use chocolate pearls for eyes and carnations for hands. The possibilities are almost endless.
- Preparation tips: Use fondant as a color base and combine it with colorful sprinkles to make even simple cookie shapes look special.

You can also make pretty cookies with chocolate chips and chocolate. The starting point is personalized cookie cutters from the 3D printer with great embossed elements .
Of course, you don't have to eat your masterpieces straight away, although your friends and family will be looking forward to them. Use suitable containers and storage options.
Step 5: Storage and shelf life
- Airtight containers
For maximum freshness, use airtight containers . This will keep your cookies fresh for up to a week. - Freeze for later
Well-packaged cookies can be stored in the freezer for up to three months .
Decorating cookies as a masterpiece
Decorating cookies is a fascinating art that inspires both beginners and professionals. With the right ingredients, tools and techniques, you can create cookies that impress both visually and in terms of taste.

Die Keckse sind sehr schön und leic
ht
Lucia on